Recurring payments. Preconditions
Recurring payments are very useful in the following situations:
- a customer needs to make repeated payments (for example, pay a monthly subscription) and authorizes the provider to take these payments without their interaction (MIT payments)
- a customer makes regular purchases at a place and wants their card details saved not to enter them every time (CIT payments)
Currently, recurring payments can only be accepted from a bank card.
Main steps
Generally, to start accepting recurring payments, you need to complete the following two steps:
- Get the user's consent to recurring payments.
- Perform a successful payment that will recur and get a token.
After completing these steps, you can proceed to accept MIT recurring payments or CIT recurring payments.
Step 1. Get the User's Consent
To perform recurring payments, you need an explicit consent of the user. You need it not only because you are going to make payments without the user being involved (MIT payments) or because you store their bank card details (CIT payments), but also for any dispute situations (e.g. if the user complaints about an unauthorized debit).
How to do it:
- Describe the payment terms to make sure the user will read them.
- Ask the user to confirm they understand and agree to the terms (e.g. add an unambiguous checkbox like Save card, Enable recurring payments, Enable recurring donations, etc.). The checkbox can be on your side (in this case, you will decide how it looks and where it is located) or on our side—in our payment widget.
Step 2. Perform a successful payment
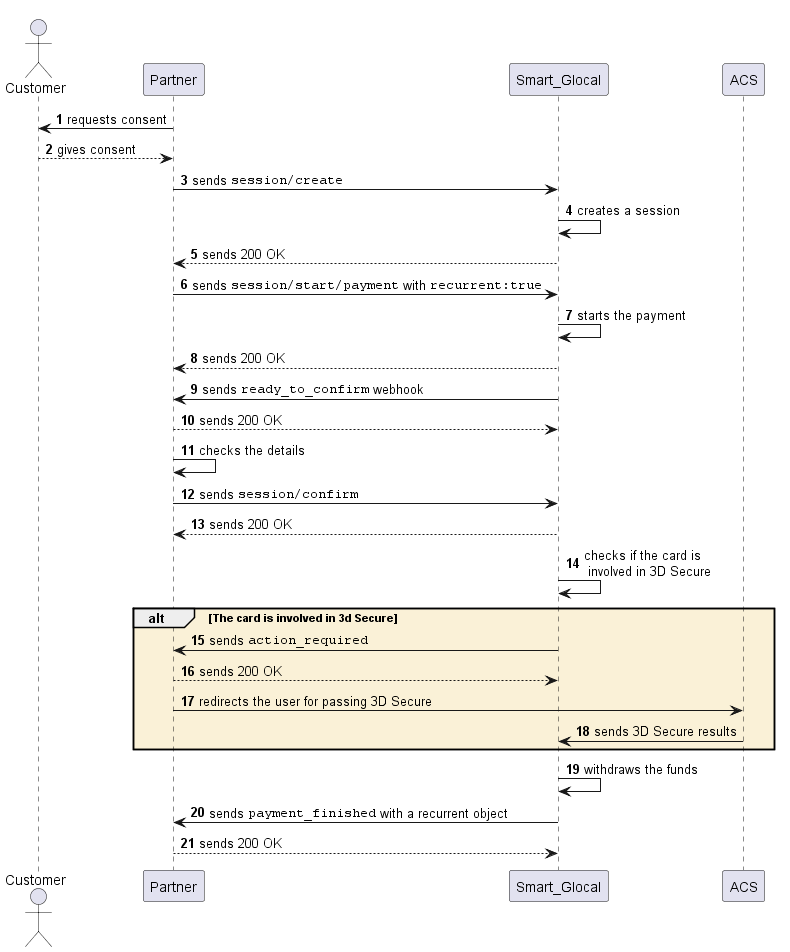
- You are passing card details with open parameters
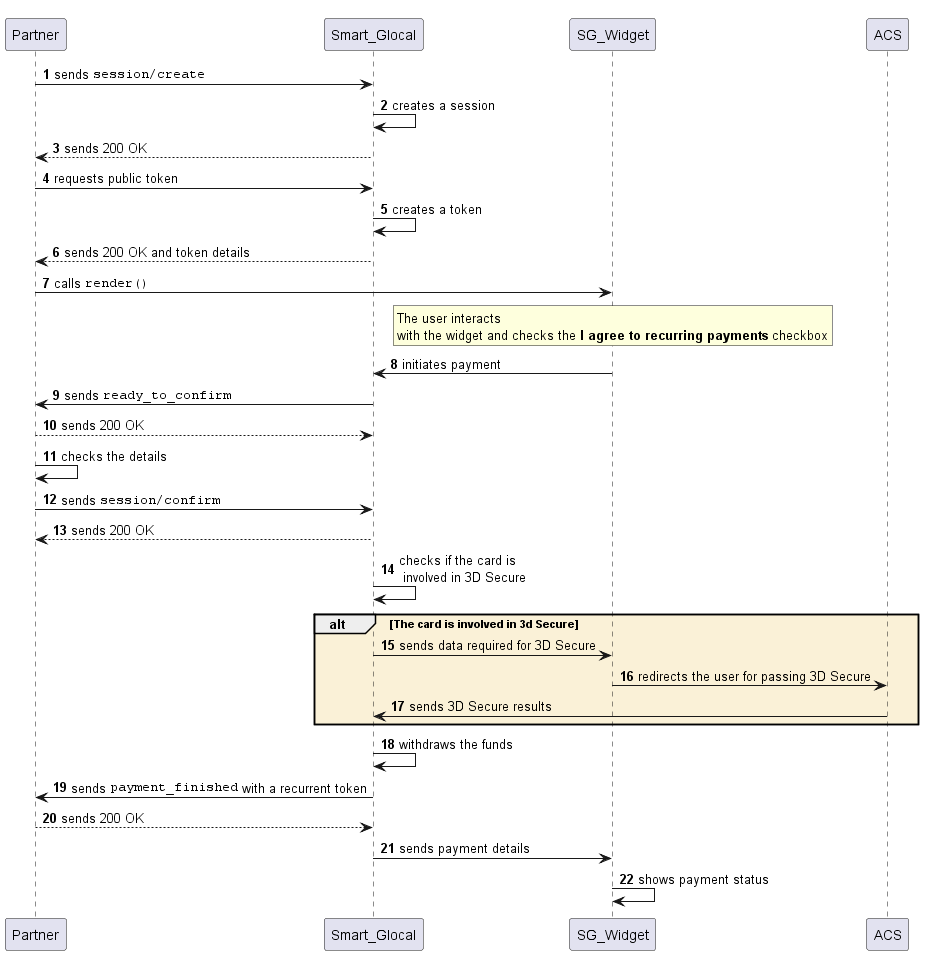
- You are using our payment widget
Make a one-time payment you plan to make a recurring one.
In the
session/createorsession/start/paymentrequest, passtruein therecurrentparameter of thepayment_optionsobject.
Example
curl -X POST \
  https://demo.smart-glocal.com/api/v1/session/start/payment \
  -H 'Content-Type: application/json' \
  -H 'X-PARTNER-PROJECT: your_project_name' \
  -H 'X-PARTNER-SIGN: signature' \
  -d '{
    "session_id":"ps_3230",
    "payment_details": {
        "type": "card",
        "card": {
            "type": "bank_card",
            "bank_card": {
                "number": "4242424242424242",
                "expiration_month": "01",
                "expiration_year": "22",
                "security_code": "087"
            }
        }
    },
    "amount_details": {
        "amount": 10000,
        "currency": "usd"
    },
    "customer": {
        "reference": "lucky"
    },
    "payment_options": {
        "recurrent": true
    }
}'
If this payment is successfully performed, you will receive a token in the recurrent object of the payment_finished webhook.
When making a payment with the widget, you have two options:
- get the user's consent earlier, pass
recurrent: truein thesession/createrequest, and show the user the standard widget- display the user the widget with the I agree to recurring payments checkbox (see an example). In this case, when the user checks the I agree to recurring payments checkbox (i.e. agrees to recurring payments from their card), you will receive a token in the
recurrentobject of thepayment_finishedwebhook.
Make a one-time payment you plan to make a recurring one using our widget.
If this payment is successfully performed, you will receive a token in the recurrent object of the payment_finished webhook.
In the
last4field of the card object you will get the last for digits of the card and can use this information to let the user know which card is used.
Now, proceed to accept MIT recurring payments or CIT recurring payments.
Managing your tokens
When you create a token, it becomes active (is_active: true) and you can perform payments using the token.
The token may expire (e.g. if the associated bank card expires).
If a token is inactive (is_active: false) or expired, the payment will fail.
To learn the token status, send a token/info request. In the type parameter, pass the recurrent_token value, in the recurrent_token.token parameter pass the token.
In return, you will get info with the token expiration date (finished_at) and token status (is_active). If is_active: true, you can perform payments using this token.
If you don't want to use a token for payments anymore (e.g. a user disabled recurring payments), send a recurrent/disable request.
In response, you will receive recurrent. If is_active: false, it means the token is disabled.
Sequence diagrams
- One-time payment for recurring payments
- One-time payment for recurring payments with the widget

