Payment page for accepting payments
Smart Glocal payment page is a ready-to-use solution for accepting payments. It works as both an on-site checkout page and a shareable payment link via a simple API.
Payment page for your customer
Your customer places an order on your website, then gets redirected to the payment page, and we handle everything from there.
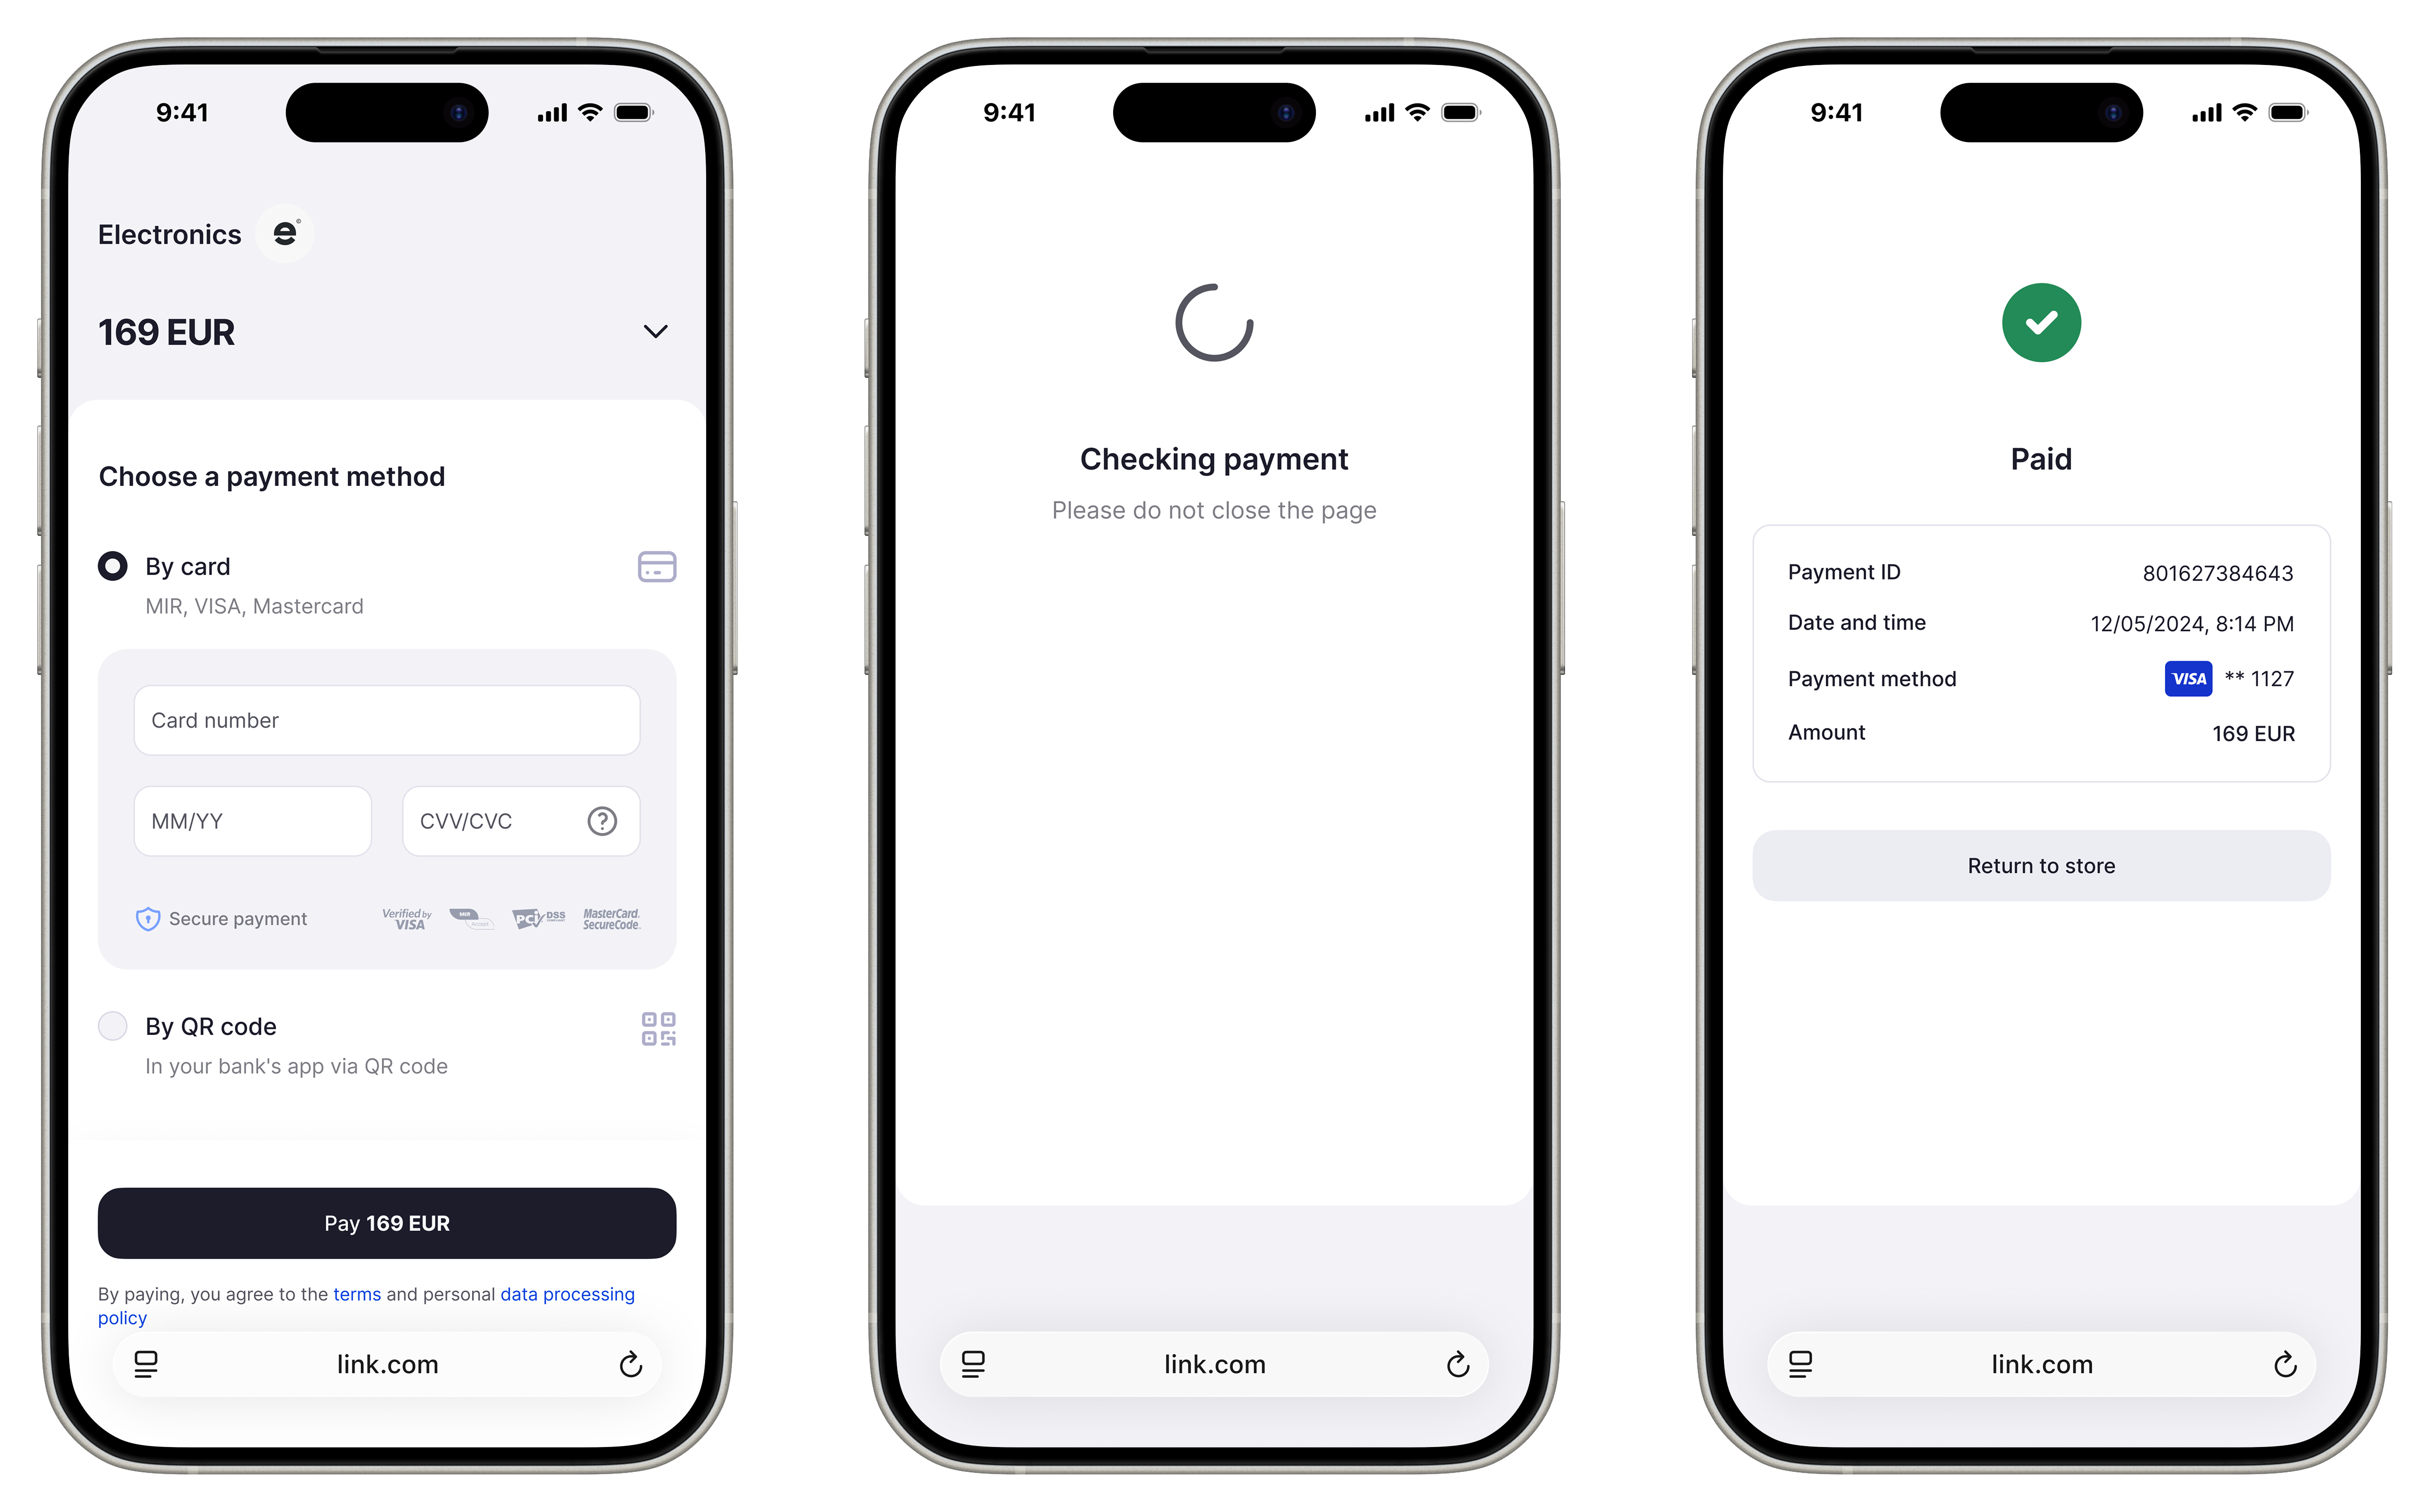
You have the options to let the customer select the preferred payment method or specify the payment method directly in the request.
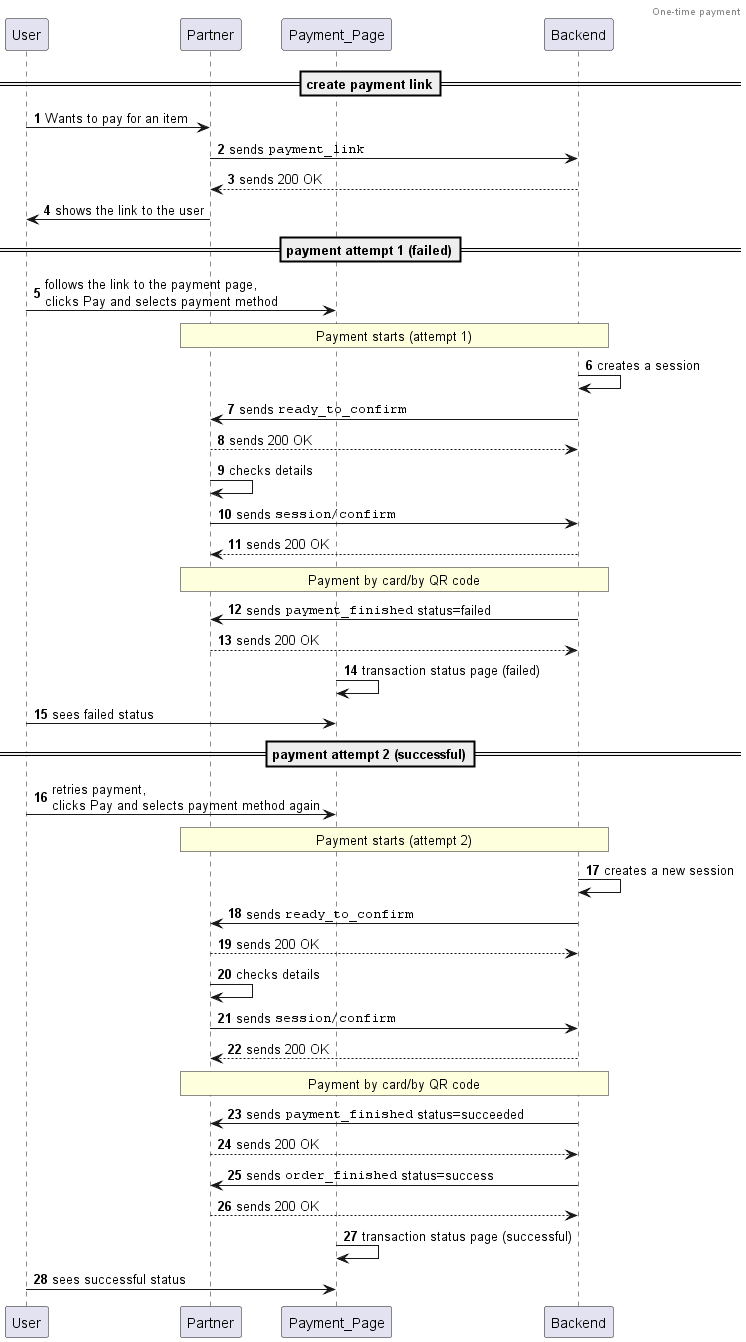
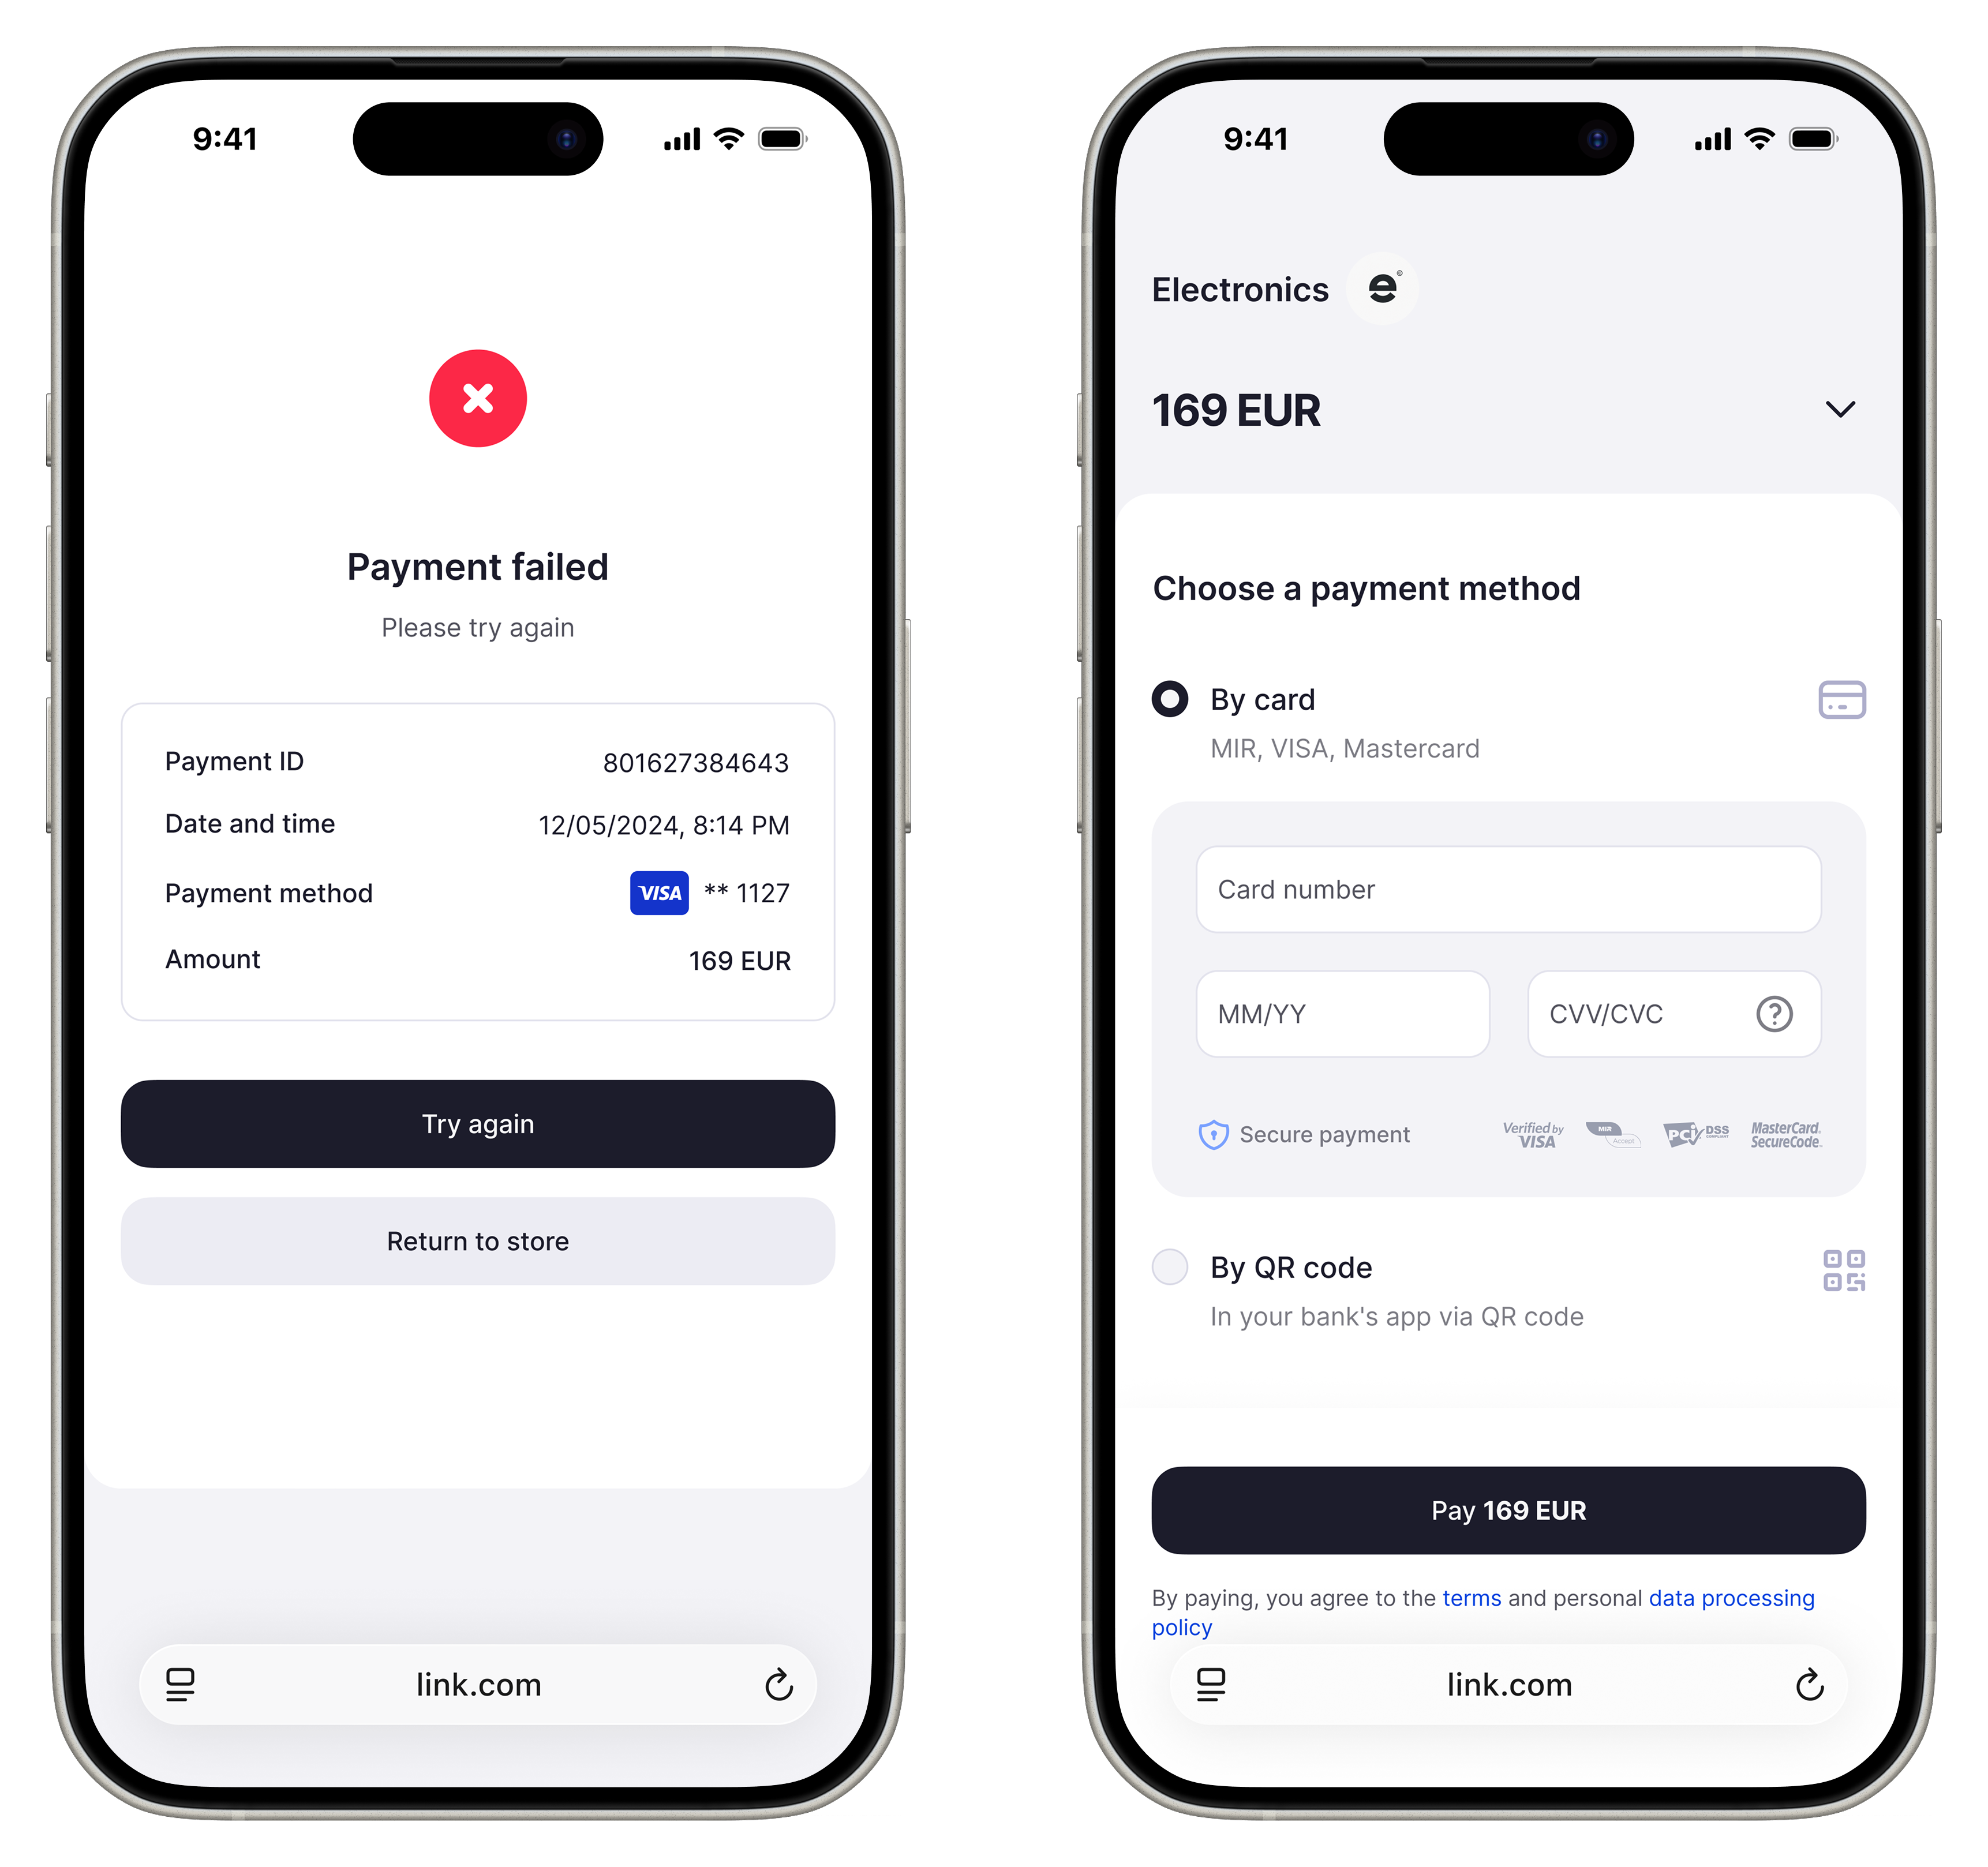
If the first payment attempt fails, the page automatically prompts a retry at the same link—no page reload needed, so you do not lose the customer. A new payment session is created automatically, no action on your part is needed.
You will receive a daily report on successful payments.
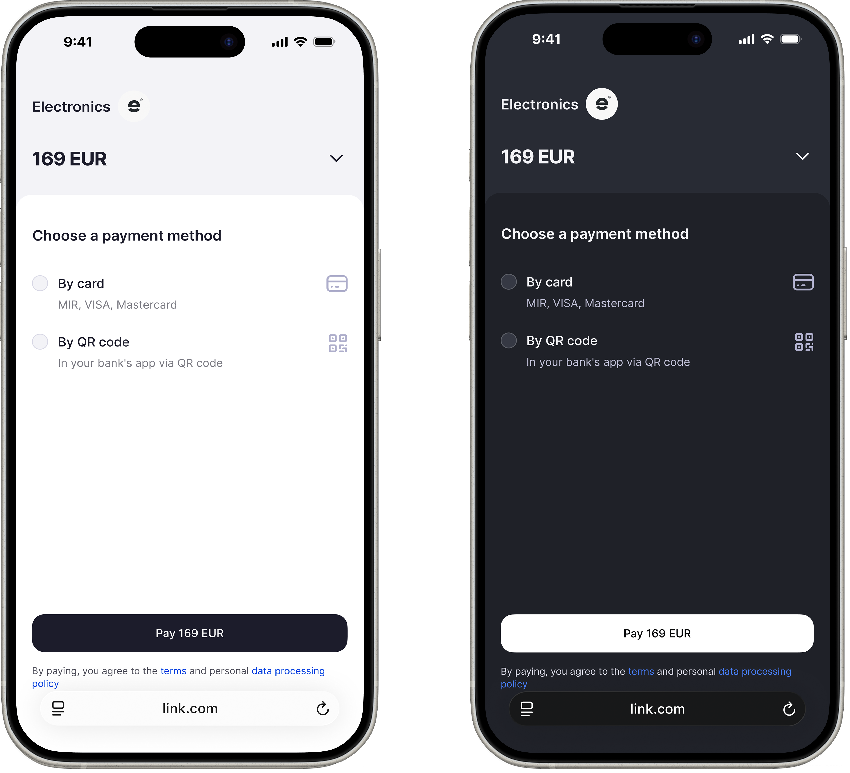
You can select the color theme that best fits your service's interface so that the payment page feels like part of your website.
Light and dark themes supported
Generating a payment link
The same API can be used not only for an on-site checkout, but also to generate standalone payment links—for example, to share with customers directly via email, messengers, or social media.
This is particularly convenient for:
- Email campaigns — generate a link per recipient and embed it in your mailer
- Social media/messengers — post the link in a story, bio, or send it directly in a chat
- Chatbots — connect the API call to your Telegram or WhatsApp bot so it issues a fresh payment link on demand
- Manual invoicing — generate a link in Postman, copy it, send it in any way you like
Please contact your Smart Glocal manager to set up this feature for your business.
To use this feature, call the POST/payment_link method using one of the following approaches:
- HTTP client (e.g., Postman) — send the request manually, copy
payment_page_urlfrom the response, and paste it wherever you need: an email, a social media post, a messenger chat. - No-code automation platform (e.g., Make or Zapier) — set up a scenario that calls the API automatically and passes the link to your mailer, Telegram bot, or any other channel.
You should always provide a clear, detailed description of the product or service being paid for. This is required for payment processing and helps avoid disputes, chargebacks, and complications with refunds.
Each link does not expire if a payment attempt fails. In this case, a new payment session will be created automatically once the customer retries the payment, there is no need to generate a new payment link.
How to process payments via API
Step 1. Create a payment link (POST/payment_link)
Send a POST/payment_link request to create a payment link. In the request, specify the amount, currency, item list, and (optionally) payment methods. In response, you will receive a payment link, which you can then provide to the customer.
A payment link remains valid during the time specified in the active_to field or until you get an order_finished webhook, whichever happens first.
Learn more on the request format
Request example
curl -X POST \
  https://demo.smart-glocal.com/api/v1/payment_link \
  -H 'content-type: application/json' \
  -H 'X-PARTNER-PROJECT: your_project_name' \
  -H 'X-PARTNER-SIGN: signature' \
  -d '{
    "amount_details": {
      "amount": 10000,
      "currency": "EUR"
    },
    "customer": {
      "reference": "customer"
    },
    "payment_methods": [{
      "type": "faster_payment_system"
    }],
    "payment_options": {
      "success_return_url": "https://test.dev",
      "failure_return_url": "https://test.dev"
    },
    "items": [{
      "amount_details": {
        "amount": 10000,
        "currency": "EUR"
      },
      "id": "5179a750-c0b0-4211-b3b1-12a72242b1a4",
      "name": "Premium Pro subscription",
      "quantity": 1
    }],
    "metadata": {
      "internal_id": "x-123-456",
      "extra": "z-aaa-bbb"
    },
    "description": "Payment #x-123-456 by shop1.com"
  }'
Step 2. Forward the customer
By any convenient means, direct the customer to the payment page using the payment link.
Step 3. Wait for a webhook confirming the payment is ready
Wait for a ready_to_confirm webhook. This means that the payment can be performed and Smart Glocal is waiting for you to confirm.
It will contain the user identifier (customer.reference) and your identifiers (metadata), if you passed these parameters in the POST/payment_link request. The webhook also provides session.id, which you can then use to start polling the payment status (using the session/status method) if needed.
Verify that the details in the webhook are correct and send HTTP 200 OK in response.
Webhook example
curl -X POST \
  https://partner.com \
  -H 'content-type: application/json' \
  -H 'X-PARTNER-SIGN: signature' \
  -d '{
    "type": "ready_to_confirm",
    "session": {
      "id": "ps_3230",
      "status": "in_progress",
      "created_at": "2024-05-27T02:03:00.000000Z",
      "updated_at": "2024-05-27T02:03:00.000000Z",
      "next_action": "confirm",
      "acquiring_payments": [{
        "id": "pm_1313",
        "status": "pending",
        "created_at": "2024-05-27T02:03:00.000000Z",
        "customer": {
          "reference": "user123"
        },
        "payment_details": {
          "type": "card",
          "card": {
            "last4": "4242",
            "brand": "visa"
          }
        },
        "amount_details": {
          "amount": 15000,
          "currency": "eur"
        },
        "metadata": {
          "internal_id": "x-123-456",
          "extra": "z-aaa-bbb"
        },
        "description": "Payment #x-123-456 by shop1.com"
      }]
    }
  }'
Step 4. Confirm or cancel the payment
Send a session/confirm request or a session/cancel request to confirm or cancel the operation.
Step 5. Wait for a webhook with the results
You may receive multiple payment_finished webhooks with the status of each payment attempt and a single order_finished webhook with the status of the order (once the order is completed and the link is no longer valid).
payment_finished
The result of the payment attempt can be found in the status field of the acquiring_payments/payment_list array:
succeededmeans the payment has been successful. This is the final status.failedmeans the current payment attempt has not been completed because of an error.
Webhook example
curl -X POST \
  https://partner.com \
  -H 'content-type: application/json' \
  -H 'X-PARTNER-SIGN: signature' \
  -d '{
    "type": "ready_to_confirm",
    "session": {
      "id": "ps_3230",
      "status": "in_progress",
      "created_at": "2024-05-27T02:03:00.000000Z",
      "updated_at": "2024-05-27T02:03:00.000000Z",
      "next_action": "confirm",
      "acquiring_payments": [{
        "id": "pm_1313",
        "status": "pending",
        "created_at": "2024-05-27T02:03:00.000000Z",
        "customer": {
          "reference": "user123"
        },
        "payment_details": {
          "type": "card",
          "card": {
            "last4": "4242",
            "brand": "visa"
          }
        },
        "amount_details": {
          "amount": 15000,
          "currency": "eur"
        },
        "metadata": {
        "internal_id": "x-123-456",
        "extra": "z-aaa-bbb"
        },
        "description": "Payment #x-123-456 by shop1.com"
      }]
    }
  }'
order_finished
You receive this webhook when an order is completed and the payment link is no longer valid. The webhook contains the order identifier and status. If the status is succeeded, the payment was successful. If the status is failed, the payment failed for the reason returned in the webhook.
Webhook example
curl -X POST \
  https://partner.com \
  -H 'content-type: application/json' \
  -H 'X-PARTNER-SIGN: signature' \
  -d '{
    "type": "order_finished",
    "order": {
      "order_id": "bYGR1PLkQ45Z7Vm9zJQx9G",
      "status": "success",
      "reason": null
    }
  }'
Recurring payments
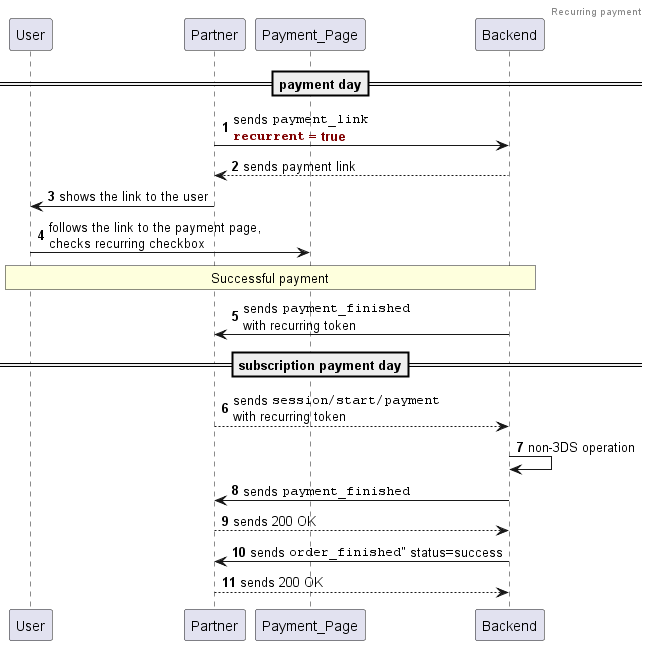
With the payment page, you can accept MIT recurring payments: the customer gives their consent for repeated payments and makes the initial payment. Then you can initiate recurring payments without the customer's involvement on your own schedule.
When creating a payment link, pass the is_recurrent: true value in the POST/payment_link request. When the user opens the payment link, they will see a checkbox to consent to subsequent charges.
Payment page with with the recurring payments option
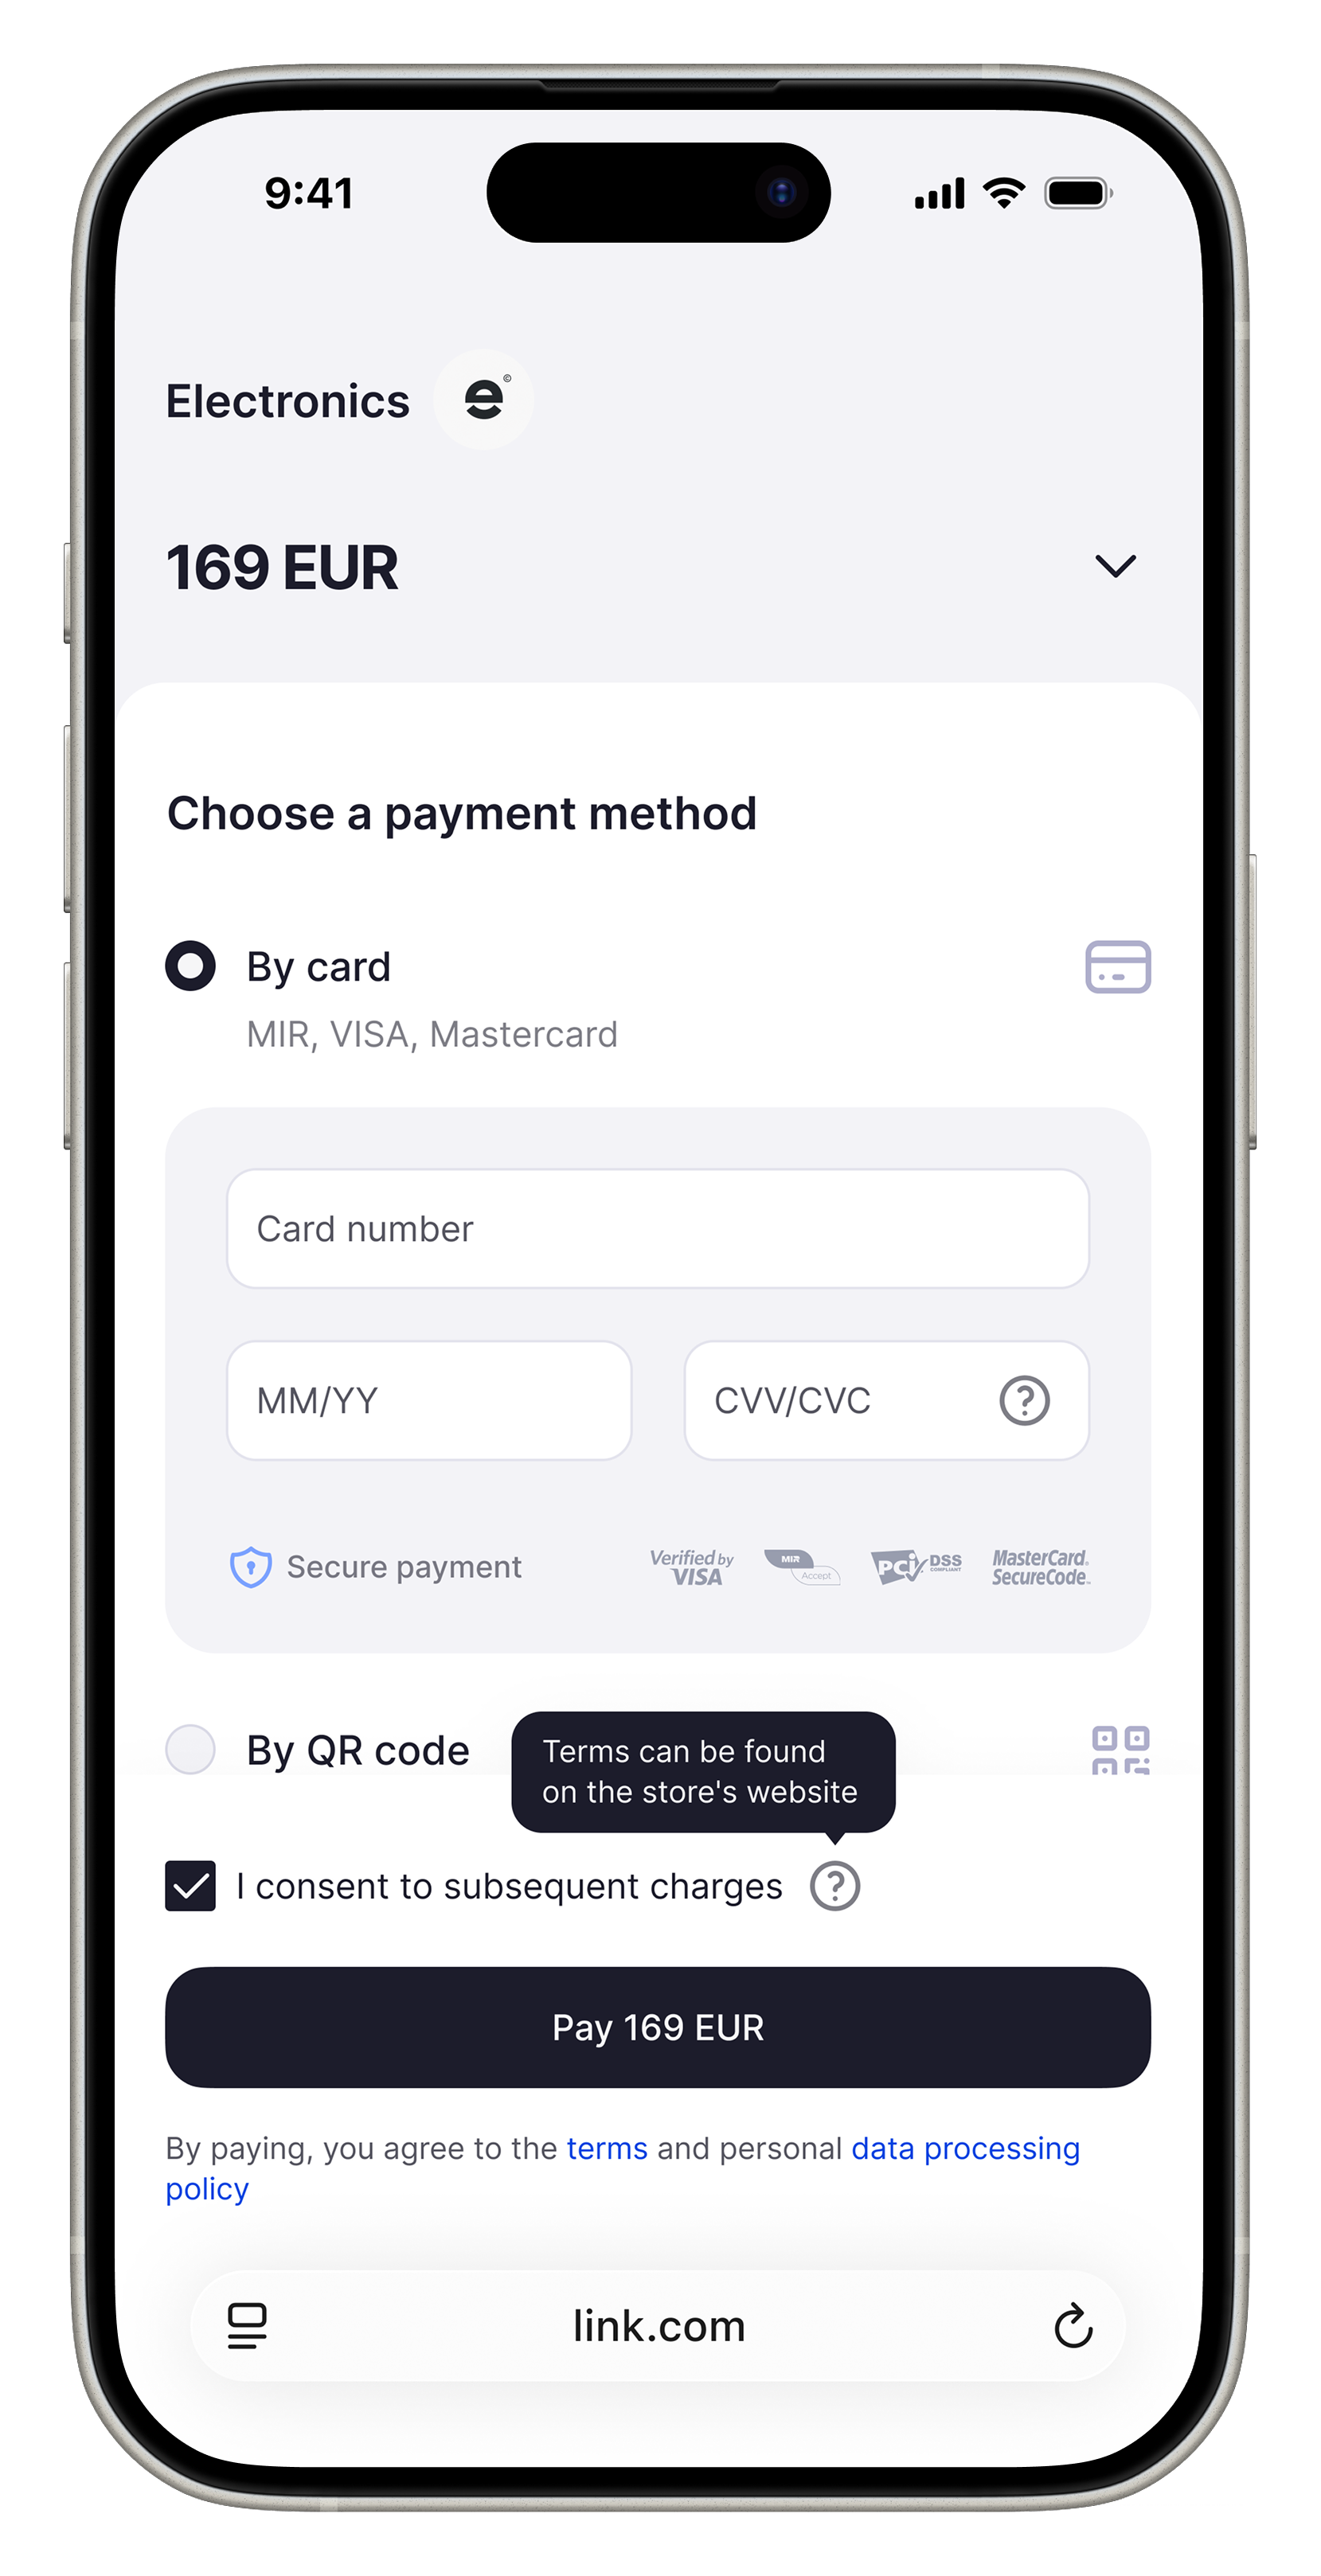
If the user checks this box and the payment is successful, you will receive a token in the recurrent object of the payment_finished webhook.
Request example
curl -X POST \
  https://demo.smart-glocal.com/api/v1/payment_link \
  -H 'content-type: application/json' \
  -H 'X-PARTNER-PROJECT: your_project_name' \
  -H 'X-PARTNER-SIGN: signature' \
  -d '{
    "amount_details": {
      "amount": 1000,
      "currency": "EUR"
    },
    "description": "Payment for order #12345",
    "link_options": {
      "is_recurrent": true
    },
    "metadata": {
      "internal_id": "x-123-456",
      "extra": "z-aaa-bbb"
    },
    "payment_methods": [{
      "type": "card"
    }],
    "payment_options": {
      "success_return_url": "https://shop.example.com/fail",
      "failure_return_url": "https://shop.example.com/success"
    }
  }'
How to make recurring payments
-
Create a payment session sending a
session/createrequest. -
Send a
session/start/paymentrequest with therecurrentpayment type. Instead of a bank card, pass the token. Passinitiator:merchantin therecurrentobject ofpayment_detailsor do not specify theinitiatorat all.Request example
curl -X POST \https://demo.smart-glocal.com/api/v1/session/start/payment \-H 'Content-Type: application/json' \-H 'X-PARTNER-PROJECT: your_project_name' \-H 'X-PARTNER-SIGN: signature' \-d '{"session_id":"ps_3230","payment_details": {"type": "recurrent","recurrent": {"token": "e9876f32bcd947f79c324cf2da5726304a894f6ae2037de7705fdb3e0a134d39","initiator": "merchant"}},"amount_details": {"amount": 10000,"currency": "EUR"},"customer": {"reference": "lucky"}}' -
Wait for a
ready_to_confirmwebhook. -
Send a
session/confirmrequest or asession/cancelrequest to confirm or cancel the operation. -
Wait for a
payment_finishedwebhook containing the payment status information.
POST/payment_link
Use this request to get a payment link. You can pass the payment method, order description, item list, and amount in the request.
If a list of items is passed, the payer will see them on the payment page.
Request parameters
| Name | Mandatory | Type | Description |
|---|---|---|---|
amount_details | + | object | Payment amount details |
amount | + | int | Payment amount in decimal format. To send 100 EUR, write 10000 |
currency | + | string | ISO 4217 currency code. Case insensitive |
customer | - | object | Data about the customer in your system |
reference | + | string | Customer identifier in your system |
payment_methods | - | array | Payment method details. Do not pass the array if you want the user to have access to all payment methods enabled for you. To offer only certain payment methods, pass them. Example: "payment_methods": [{"name": "faster_payment_system"}, {"name": "card"}] |
type | + | string | Payment method name. Options: - faster_payment_system—payment via the Faster Payment System - card—payment by card |
payment_options | - | object | Additional payment parameters |
return_url | - | string | URL by which the user can return to the site at any time |
success_return_url | - | string | URL to which the user is redirected after the payment is successfully completed |
failure_return_url | - | string | URL to which the user is redirected if an error occurs during the payment |
link_options | - | object | Additional payment page parameters |
lang | - | string | Payment page language. Default value: en |
theme | - | string | Payment page theme. Options: dark, light. Default value: light |
is_recurrent | - | boolean | Specifies whether the payment page offers the option to agree to recurring payments. If is_recurrent = true, a dedicated checkbox for recurring charges will be shown on the page |
metadata | - (mandatory for submerchants) | * | Any additional information. If the transaction is processed by a submerchant, specify the payment site: "metadata": {"submerchant": "https://website.com"} |
description | - | string | Text to be displayed to the user on the payment page. Example: Order number 345 |
items | - | array | List of purchased items |
id | + | string | Product item UUID in your system |
name | + | string | Item name |
quantity | + | int | Quantity of items |
amount_details | + | object | Amount details |
amount | + | int | Item price. The total amount for all the items must match the total of the transaction |
currency | + | string | Item price currency. The currency must match the currency of the transaction |
Request example
curl -X POST \
  https://demo.smart-glocal.com/api/v1/payment_link \
  -H 'content-type: application/json' \
  -H 'X-PARTNER-PROJECT: your_project_name' \
  -H 'X-PARTNER-SIGN: signature' \
  -d '{
    "amount_details": {
      "amount": 10000,
      "currency": "EUR"
    },
    "customer": {
      "reference": "customer"
    },
    "payment_methods": [{
        "type": "faster_payment_system"
    }],
    "payment_options": {
      "success_return_url": "https://test.dev",
      "failure_return_url": "https://test.dev"
    },
    "items": [{
      "amount_details": {
        "amount": 10000,
        "currency": "EUR"
      },
      "id": "5179a750-c0b0-4211-b3b1-12a72242b1a4",
      "name": "Premium Pro subscription",
      "quantity": 1
    }],
    "metadata": {
      "internal_id": "x-123-456",
      "extra": "z-aaa-bbb"
    },
    "description": "Payment #x-123-456 by shop1.com"
  }'
Response parameters
| Name | Mandatory | Type | Description |
|---|---|---|---|
order | + | object | Order details |
order_id | - | string | Payment link ID |
payment_page_url | - | string | Payment link |
active_to | - | dateTime | Payment link expiration date in ISO 8601 format |
error | - | object | Error description |
Response example
{
  "order": {
    "order_id": "B0k84LoQwKPq",
    "payment_page_url": "https://checkout-demo.smart-glocal.com/pay/ceMjRsrRNRcU4p3G4qLkqx",
    "active_to": "2026-04-24 14:39:43"
  }
}
Working with request signatures
Request signature
The signature is needed to verify the authenticity and integrity of requests. Smart Glocal verifies that the requests received are in fact from you (and are complete); you verify Smart Glocal's notifications the same way.
To create and verify a signature, you will need a secret key and a public key. Using your public key Smart Glocal will verify signatures of your incoming payments.
Generating a key pair
You need to generate a pair of keys on your side using the RSA signature algorithm.
Creating request body signature
The signature must be transmitted together with the request to Smart Glocal. You need to sign the request body as a whole in the form in which it is sent to Smart Glocal's server (after serializing the request body into JSON to send it over HTTP).
Use your secret key for signing the request. Create a signature using the SHA-256 algorithm. The resulting signature must then be transmitted in the Base64 format.
Verifying incoming requests from Smart Glocal
All outgoing requests from Smart Glocal are signed using Smart Glocal's own secret key.
Using Smart Glocal's public key, you need to verify the signatures of the requests coming from Smart Glocal on your side. The algorithm used is SHA-256. The signature is transmitted in the Base64 format.
Smart Glocal's public keys
Signature generation and validation examples
- OpenSSL
- PHP
# Generating a private key
$ openssl genrsa -out private.pem 2048

# Generating a public key based on the private key
$ openssl rsa -in private.pem -pubout > public.pem

# Creating myfile.txt file contents
$ echo test > myfile.txt

# Generating a signature
$ openssl dgst -sha256 -sign private.pem -out sha256.sign myfile.txt

# Signature ready for transfer
$ base64 sha256.sign

# Checking the signature
$ openssl dgst -sha256 -verify public.pem -signature sha256.sign myfile.txt
Verified OK
$data = "test";

//Obtaining the pointer to the private and public keys
$privateKey = openssl_pkey_get_private("file://private.pem");
$publicKey  = openssl_pkey_get_public("file://public.pem");

//Generating a signature based on the data using the private key
openssl_sign($data, $signature, $privateKey, OPENSSL_ALGO_SHA256);
openssl_free_key($privateKey);

//Encoding the signature into Base64 to transmit it
$base64Signature = base64_encode($signature);

//On receiving the signature, decoding it from Base64
$decodedSignature = base64_decode($base64Signature);

//Validating the received signature using the public key (success = 1)
$isValid = openssl_verify($data, $decodedSignature, $publicKey, OPENSSL_ALGO_SHA256);
Integration instructions
Please study the following before starting the integration process:
Sequence diagram
- One-time payment
- Recurring payment